Opus Clip, Submagic and Vidyo all work the same way: you upload a long video, the AI scores every moment for "virality", and you get the clips it likes. That is fine until you want something specific. When I am clipping a podcast for a client I don't want "the most viral 30 seconds". I want "every time they talk about pricing" or "the strongest hook in the first ten minutes".
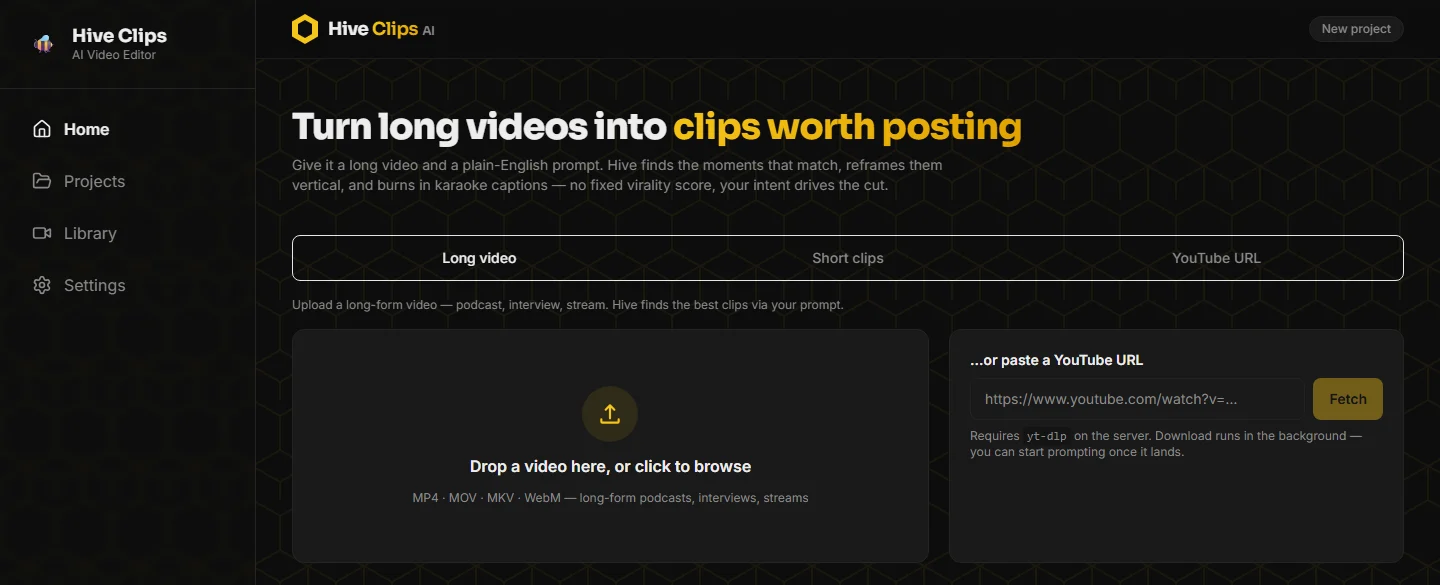
So I built my own Opus Clip alternative, called Hive Clips AI, with Claude Code. You give it a long video and a plain English prompt, and it transcribes the video, uses an LLM to find the moments that match your prompt, reframes each clip to keep the speaker in shot, burns in word-by-word captions and renders vertical clips ready to post. The prompt drives the selection, not a fixed score. That is the whole difference.
Here is how it works, stage by stage, and what I would tell you before you try building one.
What does an AI clipping tool actually do?
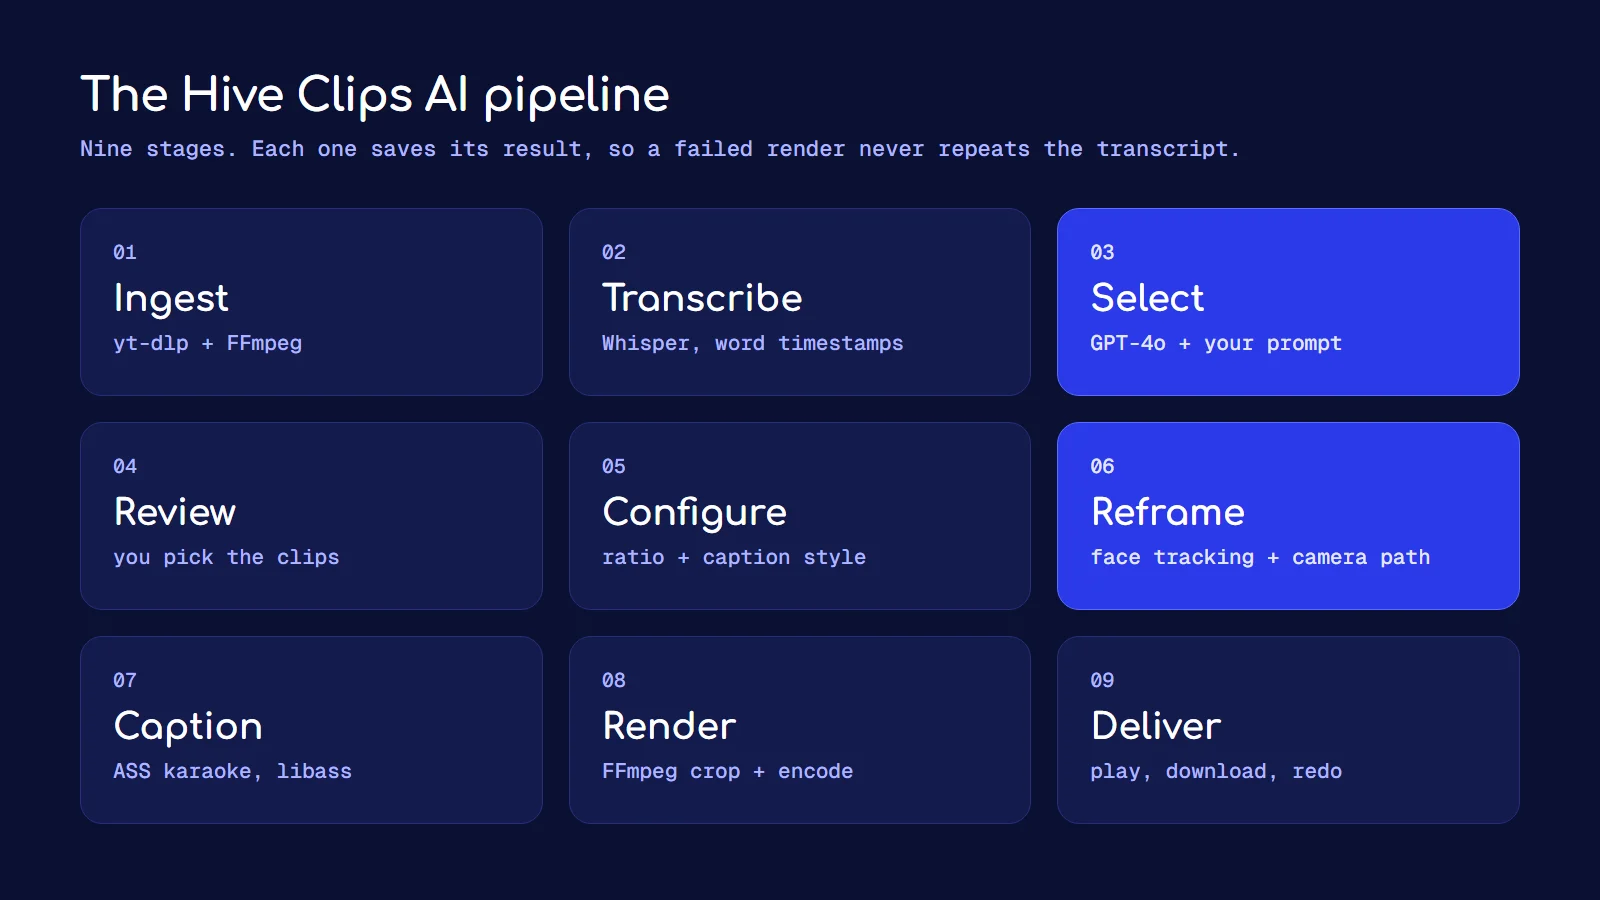
Strip the marketing away and every clipping tool is the same nine-step pipeline. I built mine so each step runs on its own and saves its result, which matters later.
| Stage | What happens | What I used |
|---|---|---|
| 1. Ingest | Upload a file or paste a YouTube link | yt-dlp, FFmpeg |
| 2. Transcribe | Speech to text with a timestamp on every word | Whisper API, or faster-whisper locally |
| 3. Select | Find moments that match your prompt | GPT-4o with structured JSON output |
| 4. Review | You pick which candidates to keep | Next.js UI |
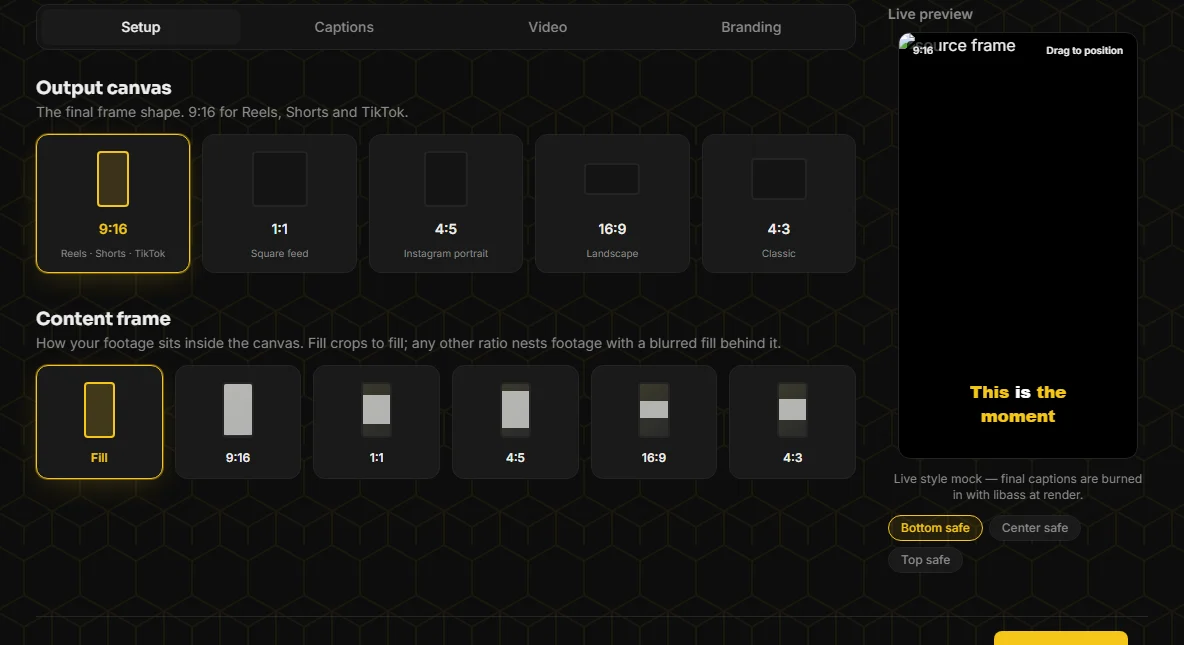
| 5. Configure | Choose aspect ratio and caption style | Next.js UI |
| 6. Reframe | Track the face and move a virtual camera | OpenCV, PySceneDetect |
| 7. Caption | Build animated word-level captions | ASS subtitles, libass |
| 8. Render | Crop, burn captions, encode | FFmpeg |
| 9. Deliver | Play, download or regenerate | FastAPI + Next.js |
The backend is Python with a FastAPI wrapper. The frontend is Next.js 15 with TypeScript and Tailwind. There is also a command line version, which is where I proved the whole pipeline worked before touching the UI.
How does the AI pick the right moments?
This is the part people assume is magic. It is mostly careful plumbing.
A one hour podcast transcript is tens of thousands of tokens. Sending all of it in one request gives you worse picks, so the transcript is split into 9 minute windows with a 15 second overlap. The overlap is there so a great moment that sits across a window boundary doesn't get cut in half.
Each window goes to GPT-4o with the creator's prompt and a strict instruction: return 2 to 5 clips, each between 20 and 90 seconds, and only clips that genuinely match the intent. The model also rates each clip's hook from 1 to 10, judged on the first three seconds, because that is what decides whether someone stops scrolling.
The output is forced into a JSON schema, so I never have to parse loose text:
{
  "clips": [
    {
      "start_time": 412.3,
      "end_time": 468.9,
      "title": "Why he stopped charging hourly",
      "reasoning": "Direct answer about pricing with a strong opening line",
      "hook_strength": 8
    }
  ]
}
After every window is done, the candidates get merged and re-ranked, and you see them in the review screen. Nothing renders until you pick. That review step is the thing I missed most in the paid tools.
Why is auto-reframing the hardest part?
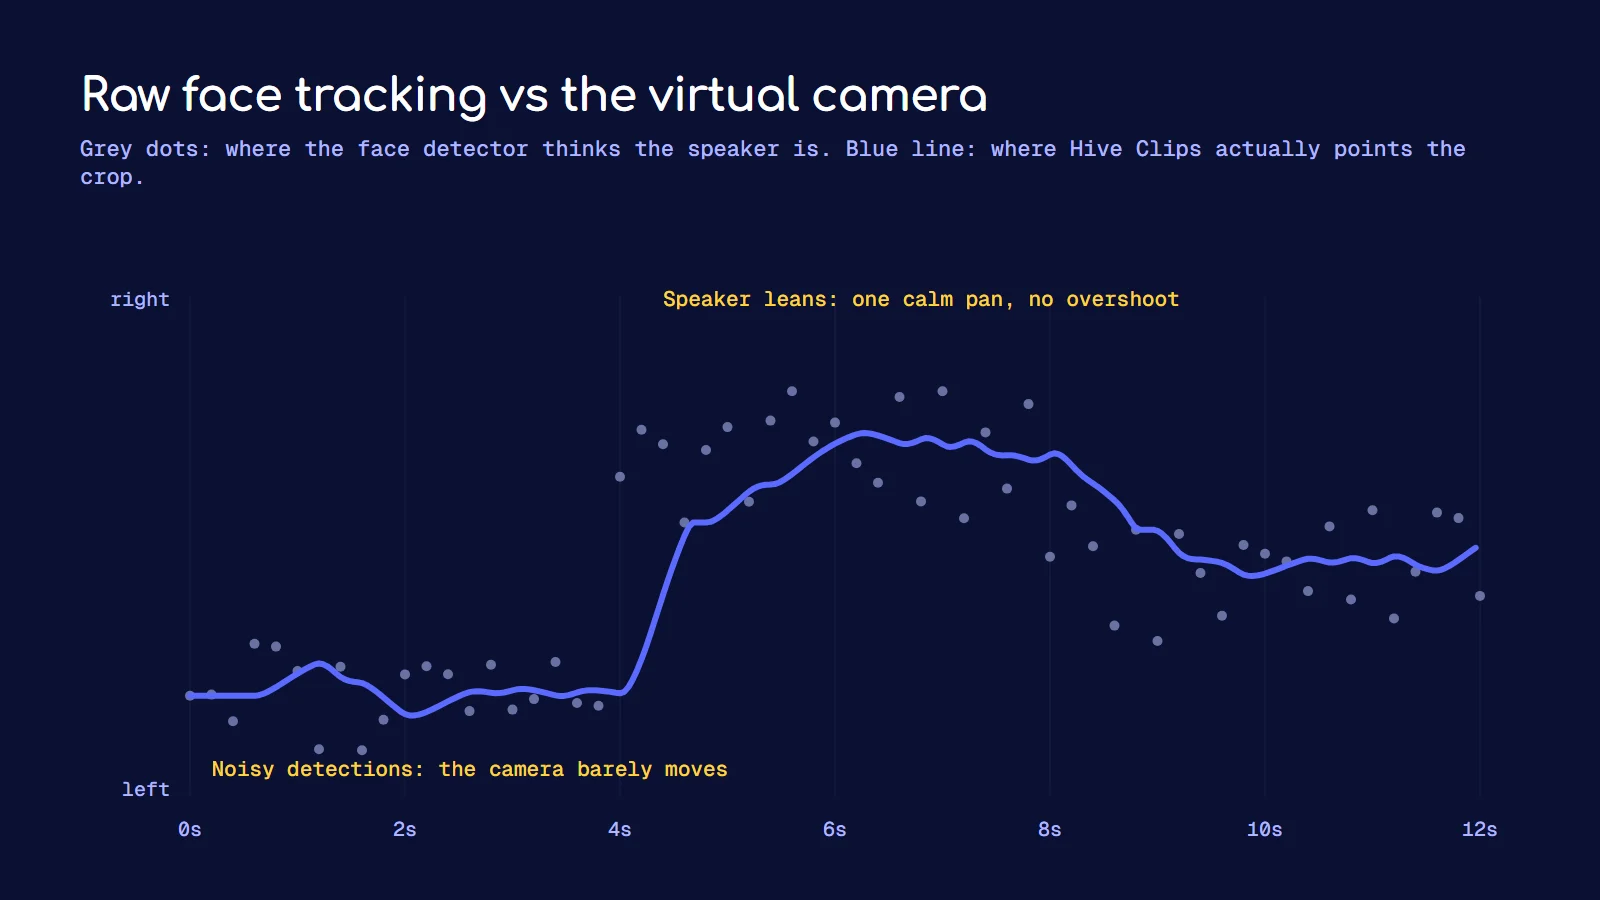
Turning a 16:9 video into a 9:16 clip means cropping a narrow window out of a wide frame and moving that window to follow the speaker. The obvious way is to detect the face on every frame and centre the crop on it.
That looks terrible. Face detection is noisy, so the crop shakes constantly, and when the video cuts to a different camera the crop slides across the cut like a drunk camera operator.
The fix is to treat the crop as a virtual camera with physics, not a box that snaps to the face:
- A critically damped spring. The camera moves toward the face but never overshoots. I ported Unity's SmoothDamp function for this. Smooth time is 0.55 seconds, which feels calm without lagging behind.
- A deadzone. If the face moves less than 6% of the crop width, the camera ignores it. This alone kills most of the jitter.
- A speed limit. Pans have a maximum speed, so a false detection can't whip the frame across the screen.
- Scene cut resets. PySceneDetect finds the hard cuts. At a cut the camera drops its speed and repositions instead of carrying a pan across the edit. Between cuts it must move smoothly.
- Headroom. The subject sits about 10% above centre, the way a real camera operator would frame a person.
The camera path becomes a crop track that FFmpeg applies during the render. Face detection itself is a basic OpenCV detector that needs no model download. I kept the smoothing separate from detection on purpose, so I can swap in a better detector later without touching the part that makes it look good.
If you build one of these, spend your time on the smoothing, not the detector. The smoothing is what makes it look professional.
How do the word-by-word captions work?
Most tutorials use SRT subtitles. SRT can't do the captions people actually want on Shorts and Reels, where each word lights up as it is spoken.
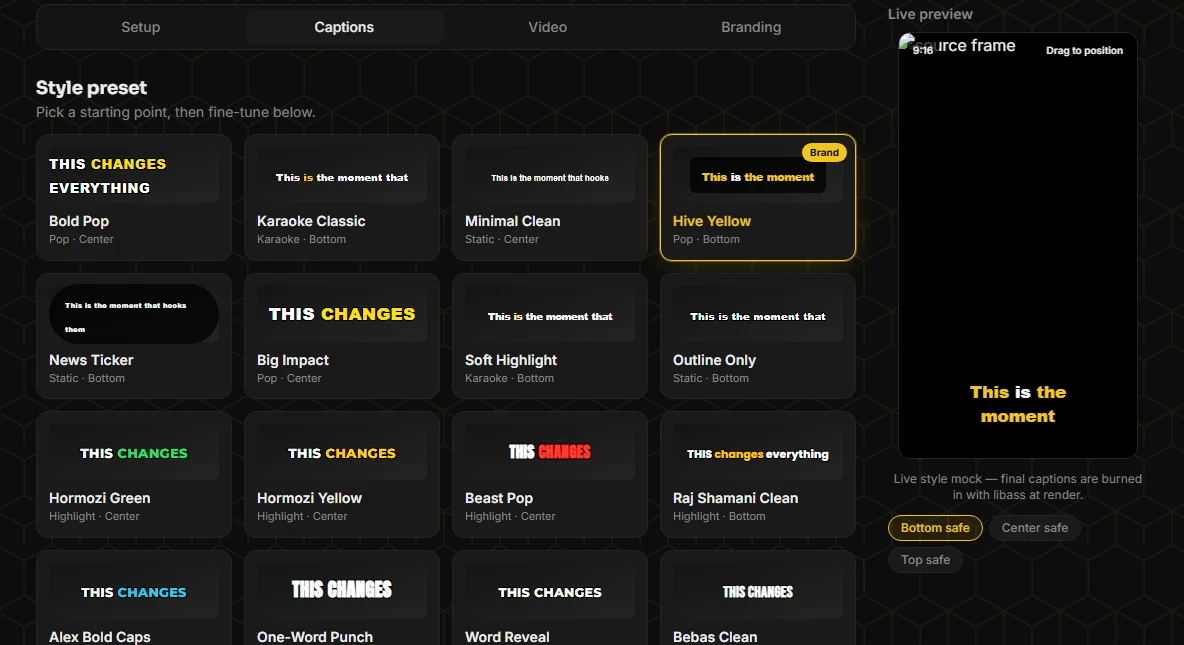
I used ASS subtitles instead. ASS supports per-word timing, colours and animation, and FFmpeg burns it into the video through libass. Because the transcript has a timestamp for every word, each word can change colour exactly when it is said.
The tool ships with 24 caption presets. The original 8 cover the basics: a karaoke style, a minimal style, a news bar and an outline style. Then I added 16 styles based on what is working on short-form right now, including a Hormozi-style highlight where the full line shows and the active word recolours, a one-word-at-a-time punch style, and a word reveal where words pop in and stay.
What broke while building it?
A few honest notes, because build logs that only show the happy path aren't useful.
The web app broke when the CLI didn't. When I added caption overrides (custom colours and sizes per clip), the command line kept working but the web API failed. The database was missing the new column. The fix was a one-line migration, but it taught me to test both entry points every time the data model changes.
Saving every stage paid off. Each of the nine stages writes its result and a job record to the database. So when a render fails, I re-run the render only. I don't wait for the transcription again or pay for the AI selection twice. On a long podcast that is the difference between seconds and many minutes.
Mock mode made testing free. Without an OpenAI key, the tool runs with a stand-in transcript and a simple moment picker, but reframing, captions and rendering are fully real. I could test the hardest parts of the pipeline all day without spending anything on API calls. The UI labels mock mode clearly so stand-in output is never mistaken for real picks.
How did Claude Code fit in?
I wrote a product spec first: the nine stages, the five screens, and the rules for each step. Then I built it with Claude Code one stage at a time, starting from the command line and proving each stage worked before moving on.
Two habits made the biggest difference:
- Interfaces before infrastructure. Storage, the job queue, the database and the AI provider each sit behind a simple interface. Right now it runs on SQLite, local files and a local queue. Moving to Postgres, Cloudflare R2 and a proper job queue means swapping one piece at a time, not rewriting the app.
- Pure maths in its own file. The camera smoother has no video code in it at all. That made it fast to test and easy for Claude Code to reason about, which is exactly where you want precision.
If you are new to building with Claude Code, my beginner's guide to building an app with Claude Code covers the setup, and Claude Code pricing and free options covers what it costs to run.
What is next for the tool?
The current build is the full pipeline plus the web UI. On the list:
- Sharper cut handling. Right now the reposition at a cut uses the last face position from before the cut, so on a hard camera change the frame catches up a beat late. The fix is to look ahead to the first detection after the cut.
- Live progress updates instead of polling every 1.5 seconds
- Regenerating only the captions or only the reframe, instead of the whole clip
- Speaker detection, so two-person podcasts can get a split-screen layout
- Running transcription and selection fully locally, with no API costs
- Auto-posting finished clips to TikTok, Instagram and YouTube Shorts
Frequently asked questions
Is there a free Opus Clip alternative?
Yes, if you are willing to run it yourself. Open-source pieces like Whisper (transcription), FFmpeg (rendering) and PySceneDetect (scene cuts) are free, and that is most of a clipping tool. The paid part is usually the AI moment selection, and you can run that on a local model to bring the cost close to zero.
How does Opus Clip choose which moments to clip?
Opus Clip and similar tools score moments with their own virality model and give you the top picks. You can't tell them what to look for beyond basic settings. A prompt-driven tool like mine lets you describe the moment you want in plain English.
Can GPT-4o pick good clips from a transcript?
Yes, if you give it structure. Split long transcripts into overlapping windows, ask for a fixed number of clips with strict start and end times, and force a JSON schema. Then review the picks yourself before rendering. It is good at finding topics, less reliable at judging delivery, which is why the review step matters.
What is the hardest part of building an AI clipping tool?
Reframing. Detecting a face is easy. Making the crop move smoothly, without jitter, without overshooting and without sliding across scene cuts, is where most of the work goes.
Do I need a GPU to run it?
No. Local transcription uses faster-whisper, which runs on a CPU, and the face detector is lightweight. A GPU makes encoding faster, and the renderer will use one if you have it.
If you want a clipping pipeline like this built for your channel or agency, get in touch.